Roguelands How to Make Levels Easier Again
- Guide by KatherineOfSky
Contents
- ane Character Cosmos
- 1.1 Starting Build
- 1.2 Class Choice
- 1.3 Attributes
- 1.4 Leveling Up
- two Brusque Ship Visit
- ii.1 Potion Pickup
- 2.2 Practice
- iii Leaping Into the Jaws of the Day!
- 3.1 Landed
- 3.2 Harvest Time!
- 3.three Ecology Hazards
- 3.iv Planet Construction
- 4 Towns
- 4.1 Shops
- 4.2 Questbot
- 4.3 The Chest - Saviour of the Roguelike!
- iv.4 Combat Chip Final
- 5 The Transport
- half dozen Now What?
- 7 Crafting
- seven.1 Recipes
- 7.2 Ultimate Crafting/Gear Mods
- vii.3 Recommended Gear Mods
- 8 Ironman Style
- 9 Cheers & End
- 9.1 Sincere Thanks!
- 9.2 Back to Business
Welcome to my Roguelands guide!
The showtime numbered sections are designed as a walkthrough for players new to the game, and advanced tips follow.
I hope you enjoy playing the game!
Character Creation [ ]
Starting Build [ ]
When you first brainstorm the game, you'll have VERY few options, so option whatever y'all have available. Over time you will unlock Races, Augments, and Uniforms, so don't fret at the lack of choices at the start of the game.
Class Pick [ ]
You pick a class based on which attributes you desire to level -- switch through the buttons on either side of the course proper name to pick attributes you want to level. The name that appears in the center is what designation each combo has.
You should choose based on the blazon of weapon you lot like to wield, whether it be ranged or melee. Nearly all races come with the sword as their first weapon, so y'all'll have to deal with that until you can craft your weapon of choice.
Attributes [ ]
- VIT earns points toward your HP level, so this is a very good choice for your get-go character, or if you tend to die a lot. The number of hit points is calculated via a formula -- it's not a direct correlation to the number that appears in your stats.
- TEC is useful with combat fries and certain ultimate weapons. It tin can be a squeamish ranged option in addition to melee gainsay.
- STR is useful for melee weapons, such as swords and lances. Damage = STR.
- DEX is useful for guns and cannons. Betoken and shoot. Damage = DEX.
- MAG is useful for gauntlets. Ranged, your projectile starts in a random spot, and then travels to your cursor. Damage = MAG.
- FTH is useful for Staves. Ranged attack which allows you to control the projectile move with your cursor. Damage = FTH/4.
For full choices, cheque Weapons folio.
- Race
Now that yous've chosen your grade, pick a race that has points in the advisable stats. At the commencement y'all will simply have access to one race, the Wanderer. If that's all yous got, pick him!
- Fidelity
Allegiance choice affects the storyline you will be playing. There are iv storylines, with the Galactic Armada existence the easiest.
- Uniform
Every bit you progress, you will unlock new uniforms which also requite you lot diverse bonuses. Option the one that gives you the all-time do good, (or the default if you take none)
- Augment
Similar Uniforms and Races, these are unlocked via playing the game, and too give bonuses. Picket out for detrimental items here, though -- they are trolls from the dev! 😉
Leveling Up [ ]
The style leveling works is this: every level up, you proceeds additional stats from:
- Your Class
- Your Race
They alternate each level, every 3 levels giving you an amount equal to the starting stats of the character. (Example: Choosing a Wanderer with Enforcer. The showtime level upwards volition give +1 VIT, +1 DEX, +1 FTH, every bit per the Race. The second level up will give +1 STR, +1 VIT, as per the Form. Odd levels will re-create the first, and evens the second. If you lot chose certain Uniforms or Augments, they also add together stats on EVERY LEVEL... which can be a very powerful style to gain stats!)
- To the Ship!!!
Save your character and proceed to the game.
Short Ship Visit [ ]
Potion Pickup [ ]
If this is your Starting time playthrough, you will be able to option upwardly some free health potions in the market place role of the ship.
- Become to the doorway far to the left, and Enter with W (up key).
- Go to the 2d level of the Market area. Press Due south (down) to go down to the platform beneath.
- Talk to the Flora with Westward.
- She'll give yous a few health potions to help you along.
(Note: She'll give potions simply one time on a regular character.)
Practice [ ]
Now is a really good time to practice your moves.
- Utilize WASD to move effectually
- Space allows y'all to jump
- Q and Eastward will let y'all to dash speedily left and correct.
- Yous can "fly" by jumping multiple times in the air; the same with dashing. (The only limit on these actions is your yellow Stamina bar at the meridian left of the screen).
- Get into Gainsay fashion past right clicking. Your mouse cursor will turn into a crosshairs, and you lot'll see your weapon. Practise swinging it a couple times with left click to get a skillful feel for it.
Get used to these controls before you leave the ship!
- Into the World!
Get back through the doorway at the upper right of the market, and yous'll arrive back in your private quarters.
Leaping Into the Jaws of the Solar day! [ ]
Enter the portal ![]() on the correct side of the screen. When you are about it, it should say "Hostile Zone".
on the correct side of the screen. When you are about it, it should say "Hostile Zone".
The very starting time biome planet type is the Desolate Coulee. Even though this is the first biome, exercise not be complacent; it is very unsafe to the uninitiated!
You will be starting out with a very bones weapon and fiddling HP. When you die, you lose whatever is in your personal inventory, and your level will be reset to zero again...
Landed [ ]
When you spawn into the world, you will be greeted with a new temper. Walk carefully to the edge of the cliff, and almost always, 2 dunebugs will "greet" you lot.
Either wait for them to jump up to your level, or you can quickly dash across, plough round, and hit them from behind. Your sword will knock them dorsum a little, enabling you to strike many times.
Dunebugs ![]() tend to crawl on the ground, then jump upward unexpectedly. When they are dead, they will drop lilliputian floaty XP bubbling, and usually some kind of material -- probably monster optics. Both should magnetically attract to y'all when y'all are in range.
tend to crawl on the ground, then jump upward unexpectedly. When they are dead, they will drop lilliputian floaty XP bubbling, and usually some kind of material -- probably monster optics. Both should magnetically attract to y'all when y'all are in range.
Shmoo![]() (brownish animal) won't hurt you if you contact him, simply y'all tin can all the same kill him for some XP.
(brownish animal) won't hurt you if you contact him, simply y'all tin can all the same kill him for some XP.
Wasp![]() can fly through blocks, direct toward you!
can fly through blocks, direct toward you!
Eyepod![]() crack themselves open on touch or attack, and a long worm
crack themselves open on touch or attack, and a long worm ![]() comes out. These worms tin can swirl forth the unabridged map, though blocks, etc., so watch out! I recommend that you NOT assail whatsoever of these on your commencement few runs: if you lot cleft open five of them, the boss Urugorak will spawn!
comes out. These worms tin can swirl forth the unabridged map, though blocks, etc., so watch out! I recommend that you NOT assail whatsoever of these on your commencement few runs: if you lot cleft open five of them, the boss Urugorak will spawn!
Harvest Time! [ ]
Resource Nodes: When you are in normal mode (weapon put away), you can click on bushes/trees, rocks, and bugspots, and your personal drone will harvest them. Once y'all get enough materials, make more drones, and you can harvest up to 3 nodes at in one case.
Objective: These gray objectives are located around each biome, 3 per map. Press W, (up) to collaborate with them -- they will disable you lot for a few seconds, simply give you both XP and items!
Chest: Gilded and silver chests randomly spawn in each biome and incorporate materials when yous open them.
NPCs: There is a different NPC who patrols each biome. They are friendly and volition requite you a souvenir when you lot talk to them.
Portals: Walking in front of these gives you +three portal uses to whatever environment you are in. More on that in the Send section.
Environmental Hazards [ ]
Rocks etc.: Watch out for rocks, (and other similar hazards in other environments). They damage you on touch. They always follow a specific round blueprint, so don't surprised when the travel over the same spot twice!
Special Events: Every now and once more, at the first of the map, Lenny will warn you that "something doesn't experience right". If you are depression-level, RUSH to the exit.
These "special events" include:
- Pirate attacks - several pirate ships will descend and shoot at you. They are killable.
- Falling star Shower - a faster, more frequent, and purpler version of flying rocks. Dodge!
Planet Structure [ ]
There are always 2 rooms on the left, and 3 on the right. You enter at A, and the cease of the level is ALWAYS the upper right room (B), which leads to the out-going portals.
Possible configurations:
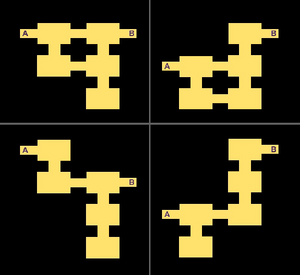
Spawn is at A, and end portals are e'er at B. Annotation, sometimes the entrance (A) is on the lower left room.
Make your fashion to the exit. Don't worry most killing too many enemies -- simply get out Alive.
- Leveling Up
With all practiced luck, yous have gained a level or two! Congratulations!
Towns [ ]
Betwixt each map is a rest area, a "boondocks". Here, you tin can buy items with your hard-earned credits, bank check on quests, and impale a few docile beasts for a fiddling extra XP.
The very beginning affair you will want to do is grab the XP fount. This XP is for your GEAR, not for your character.
You must have the gear equipped in order to collect the XP, so if this is your showtime playthrough, all you lot will accept is a sword. The fount pulses with different items, (they always go in the aforementioned lodge), then JUMP when the weapon XP comes upward.
Shops [ ]
In that location are various items on sale. You probably won't want to purchase much except for health potions on your first run through... unless they have a proficient Gainsay Chip.
Note that the prices are non fixed -- sometimes you can discover better "deals" than others. The option is always random, though item quality and rarity increases with Claiming Level.
Questbot [ ]
On the go out track, Questbot has a nice little stand where you can bank check what needs doing and what kinds of rewards you will become.
If he asks for items, only put the stack in the empty foursquare and yous will get your reward. (Don't worry, he won't accept more than he's request!)
For impale quests, the reward appears in the box.
When you lot TAKE the reward, you get actress xp for completing the quest.
The Chest - Saviour of the Roguelike! [ ]
Earlier you leave, PUT EVERYTHING IN THE Chest.
Everything stored in the breast will carry over for all characters on your account, and then in example you die, something will be saved.
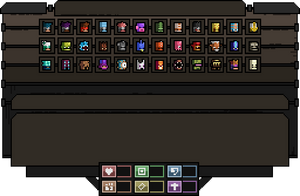
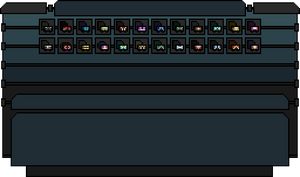
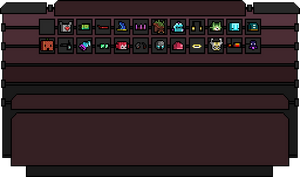
Gainsay Scrap Terminal [ ]
Equally in the Ship, the Combat Chip Terminal allows you to switch out your Combat Fries and store excess in the box.
The bar at the top are the fries you tin activate (if applicable) in boxing. The box in the middle of the screen is your storage space.
Combat Chips can either exist Active or Passive.
- Passive Chips part every bit extra stat points. Y'all tin go them from killing/gathering too as from shops. Choose chips that benefit your build.
- Agile fries take special abilities. e.k.:
- Healing Ward - Activation spawns a healing bubble on the footing that heals for ane signal per tick. Elapsing scales with FTH.
- Bubble - Activation builds a bubble around you that prevents impairment from one set on. Scales with FTH.
- Turret - Activation spawns a turret at your cursor. Damage scales with TEC
- Back to the Ship!
Since you at present have some ingredients, go dorsum to the ship and then you can craft some survival materials... Make your way to the LEFT side of the screen and enter the ship portal.
The Ship [ ]
The send is where you spend your time crafting, storing materials, and completing quests.
- Your Quarters
Your personal surface area of the send contains all the crafting stations you need to make almost everything in the game.
- Alchemy
The very first thing to do is create more health potions! Printing W at your Alchemy station, and y'all will be presented with the crafting interface.
THE ORDER OF THE ITEMS MATTERS -- identify the ingredients in the squares, and make a few wellness potions for your next run. (Spam-click the Potion Button to craft.)
For easier crafting next time, just click the List Icon in the upper right hand corner, select the potion, and as long as y'all have the items in your inventory, yous can click to make more. Annotation: if you are lucky, you lot'll make more one potion per click!
- Chest
This is where you lot store all of your items. They will be shared with all non-Ironman characters.
You can purchase extra tabs with Credits. Be sure to organize your chest well -- I try to put all basic items in the beginning tab for easiest dumping after a level. Rarer items go in further tabs.
- Combat Chips
identical to the interface in the Towns, allows you to change your loadout of Gainsay Chips.
- Emblem Forge
Create Emblems from raw materials. It takes 10 materials to make a unmarried Emblem. Emblems are used to create Weapons & Armor, and await similar circles/buttons.
To use, grab the icon and click it over your stacks of cloth. Notation that the "wand" will arts and crafts ALL the resource in a stack in multiples of ten... and then if you want less quantity, interruption upward the stack.
- Gear Forge
Create Armor and Weapons from Emblems.
Similar Alchemy, the society of the emblems is crucial to creating the correct item.
- Quality
Crafting college quality items is a matter of luck. Do note that although the extra stat heave is fantastic at early levels, subsequently, an extra few points isn't so significant, so don't worry if you can't become a gold item when you craft.
Stat boosts are as follows:
- Greyness: base
- Blue: +3 to non-zero stats
- Purple: +6 to non-naught stats
- Gold: +9 to non-naught stats
- Planet Selector
This station allows you to choose a planet to go to. In order to "unlock" planets, y'all demand to go to those worlds and find portals. Each ane plant volition give y'all 3 portal uses to that globe.
The portals to Mech City, One-time Globe, and the Forbidden Arena are also selectable here: buy tickets at the Market place.
- Ship Droids
In the lower left, out of the picture, is the Transport Droid surface area, which produces World Fragments besides as random Emblems. Make certain to upgrade/add more than ship droids with Credits. (Click on an empty square to purchase a new transport drone).
Note: these are static, and unlike from personal droids. Increase & upgrade of Ship Droids produces Globe Fragments and Emblems at a faster rate.
- The Market
On the right part of the commons, you have various people to chat with, including the Questbot, and the Recycler guy. (You use the recycler similar to the Emblem creator -- clicking on items in your inventory transforms them into credits).
You tin also buy blocks to personalize your ship. The currency for these is Scrap Metal. If you happen to accidentally lose i of your crafting stations, buy a replacement on the bottom floor.
On the left side of the Market, you tin can purchase various items, including tickets to Old Earth, the Arena, and Mech City. Wealth Trophies can aid yous consilidate your earnings if you are running out of space.
On the top level on the left side of the Market, the doorway leads to the Headquarter.
- The Headquarter
A simple room populated by the e'er-chatty Lenny and Captain Atlas. Interacting with Atlas volition put you on the story questline.
At present What? [ ]
Now, you collect more than materials, craft droids, armor and weapons, leveling as you go. (Consider crafting any Tier 1 Armor/Shield/Helm items, simply so you take a few actress stats, even if it doesn't match your build precisely.) Afterwards, yous will be able to go higher-level materials.
Every bit you level upwardly, you'll discover which weapons y'all similar using and which not, enabling you to pattern a more comprehensive build.
At some point, you will die.
That's a good matter, since only by dying can yous proceeds more Races, Uniforms, and Augments to create new characters with.
On your death screen, make sure to click the treasure chests to go your prizes!
- Catastrophe Options
- "Retry" volition respawn your graphic symbol over again -- all attributes volition be the aforementioned as you chose them. Yous'll be at level 1 once more, and all personal inventory will be gone, except for a starter weapon.
- "Main Menu" will completely delete your graphic symbol, and you'll demand to select everything anew.
- As long as you lot are playing a non-Ironman character, your Storage Chest items will be saved. The ship itself (and your customization) is common to all characters, likewise as the Transport Droid upgrades, etc.
Crafting [ ]
The loots autumn into basic categories & tiers: Bugs, Monster Parts, Ores, Plants, Tiers 1-6, each of which appears in different planets.
Recipes [ ]
These are bones recipes to add to your Crafting Stations.
Ultimate Crafting/Gear Mods [ ]
Mech Urban center is the place to do both Ultimate Crafting and add Mods to your Gear.
To get to Mech City, buy an Ion Ticket at the Market in the Send Eatables area. And then, choose Mech City at the Planet Selector, and go!
- Adding Mods
Mods are small bill of fare-like items that more often than not drop on Challenge levels. They range from adding basic stats like VIT, STR, MAG, etc. to increasing XP gain, Credit Heave, Bug Find, Projectile range, etc.
When you go to Mech City, place the particular you want modded into the Gear Modification station.
- Y'all may place THREE types of mods into the particular. You tin stack them up to v times.
- They are NOT REMOVABLE, so think advisedly before you mod an item.
- You can add actress stacks at any time, they need not be "filled" all at one time.
Recommended Gear Mods [ ]
 |
|
This recommendation listing is based on what the community has discovered, equally well every bit my personal preferences.
- On each character, I Ever put +HealthRegen on their shields -- this saves on health potions and allows you to recover HP while out and about.
For example: In nearly games you would choose +Crit Take chances, + Crit Damage, and +MainStat. The Pulley Sword is an amazingly powerful weapon, however... information technology does non crit! Thus, ii out of those three "standard" mods would be useless.
For my Pulley Sword I chose:
- +ProjectileRange: Range can too be thought of every bit the length of fourth dimension a projectile stays spawned... so my projectiles volition stay on the screen much longer, thus increasing the number on-screen and killing the enemy!
- +STR: Main boost stat for the weapon.
- +XP Heave: Since this is a character I am farming Combat Trophies on, I want the extra XP.
One of the more than interesting cannons, the Flame Swathe, gets +CritRate, +CritDamage, and +ProjectileRange for max damage!
The Seeker of Stars Staff Ever crits, so no need for +CritChance, but +CritDamage is a must!
Ironman Manner [ ]
In Ironman Mode, you will be unable to access your chest or play with others. It is totally up to your new character to raise his ain fortunes! (or is information technology???). Cheque Tips & Tricks.
Highly recommend choosing a grapheme grade/race with Vitality stat.
- Uniforms
Minister - Gain 1 FTH or VIT on level up. (FTH corking for Healing Wards, VIT good for more HP).
Dirtmage - Reduce incoming damage past 5 to a min of 1. (Must reach IM level 75 showtime. Skilful for a secondary playthrough).
Monster Trainer - Immunity to Frost, Burn, Poison
If you don't have any of these, choose a Uniform that levels your primary Stat.
- Augments
Beats by Boizu - Bonus Dash Speed and Leap Superlative.
Crown - Reduce damage by v to a min of one.
Crusader chapeau - Max HP is 125
Thank you & End [ ]
Sincere Thanks! [ ]
A big Thank You to everyone who has shared their knowledge on the Forums and through populating the Wiki with information. Without sharing in the community, I cartel say that we would not exist having equally much fun with the game!
Back to Concern [ ]
Back to playing Roguelands! I promise you've enjoyed reading this guide: I welcome all comments!
Have fun!
Source: https://roguelands.fandom.com/wiki/Guides/Super_Noob_to_Super_Fun_Times!
Belum ada Komentar untuk "Roguelands How to Make Levels Easier Again"
Posting Komentar